
Is your built-in kitchen soap dispenser running low or empty? Filling it might seem tricky if you haven’t done it before, but it’s easier than you think.
Knowing how to refill your dispenser quickly saves you time and keeps your kitchen looking neat. In this guide, you’ll discover simple steps to refill your soap dispenser without any mess or hassle. Keep reading, and you’ll never have to worry about running out of soap while cooking or cleaning again.
Choosing The Right Soap
Choosing the right soap for your built-in kitchen soap dispenser helps it work smoothly. The right soap keeps the dispenser clean and prevents clogs. Not all soaps suit these dispensers. Some soaps are too thick or cause damage over time.
Types Of Soap Compatible With Dispensers
Liquid dish soap is the best choice for most kitchen soap dispensers. It flows easily and cleans well. Hand soap that is liquid and mild also works fine. Avoid soaps with added moisturizers or strong chemicals. These can gum up the dispenser parts.
- Dishwashing liquid (standard, mild formulas)
- Liquid hand soap (unscented or lightly scented)
- Foaming soap (if your dispenser is designed for it)
Avoiding Thick Or Abrasive Soaps
Thick soaps can clog the dispenser pump and tubing. Abrasive soaps may scratch or wear out the dispenser parts. Stay away from gels, lotions, or soaps with exfoliating beads. These can cause leaks or blockages, requiring repairs or cleaning.
- No soap bars or solid soaps
- No heavy gel soaps or lotions
- No soaps with scrubbing particles
Locating The Dispenser
Finding the built-in soap dispenser in your kitchen is the first key step to keeping it filled and ready for use. These dispensers are designed to blend seamlessly with your sink area, which sometimes makes them tricky to spot. Knowing exactly where to look and what to look for saves you time and avoids unnecessary frustration.
Identifying The Soap Dispenser Pump
The soap dispenser pump usually sits next to your kitchen faucet, often on the right or left side. It looks like a small, sleek nozzle that you press down to release soap.
Sometimes, it can resemble a mini faucet or a sturdy button. If you’re unsure, try gently pressing on any unusual knobs near the sink—if soap comes out, you’ve found it!
Accessing The Refill Opening
Once you’ve located the pump, the refill opening is typically right below it, hidden under the counter. You might need to look underneath the sink to find a plastic bottle or reservoir attached to the pump.
Unscrew the pump head from the top of the sink to open the refill hole. Be careful not to force it if it feels stuck; a little wiggle usually helps loosen it without damage.
Preparing For Refill
Preparing to refill your built-in kitchen soap dispenser sets the stage for a smooth process. This step ensures safety and cleanliness. Taking time to get ready prevents spills and messes. It also helps you find the right supplies quickly. Follow simple actions to make refilling easy and hassle-free.
Clearing The Area Around The Sink
Clear all items near the sink before starting. Remove dishes, sponges, and soap bottles. Wipe the countertop to avoid slipping or spills. A clean workspace makes refilling safer and faster. It also helps you spot leaks or damage around the dispenser.
Gathering Necessary Supplies
Collect all tools and liquids needed for the refill. You will need liquid soap designed for dispensers. Avoid thick or foamy soaps that may clog the pump. Have a clean cloth or paper towel ready for wiping. A small funnel can help pour soap without spilling. Preparing these items saves time and avoids interruptions.
Step-by-step Refill Process
Refilling your built-in kitchen soap dispenser is easier than you might think. The process involves just a few careful moves to avoid mess and keep everything working smoothly. Let’s break down the refill process into clear, manageable actions that anyone can follow.
Removing The Pump Head
Start by locating the pump head on your soap dispenser. Gently twist it counterclockwise to unscrew it from the reservoir below. If it feels stuck, a little extra grip from a rubber glove can help without forcing it and causing damage.
Make sure to place the pump head on a clean surface to prevent dirt from contaminating the soap. This small step can save you from clogged pumps later on.
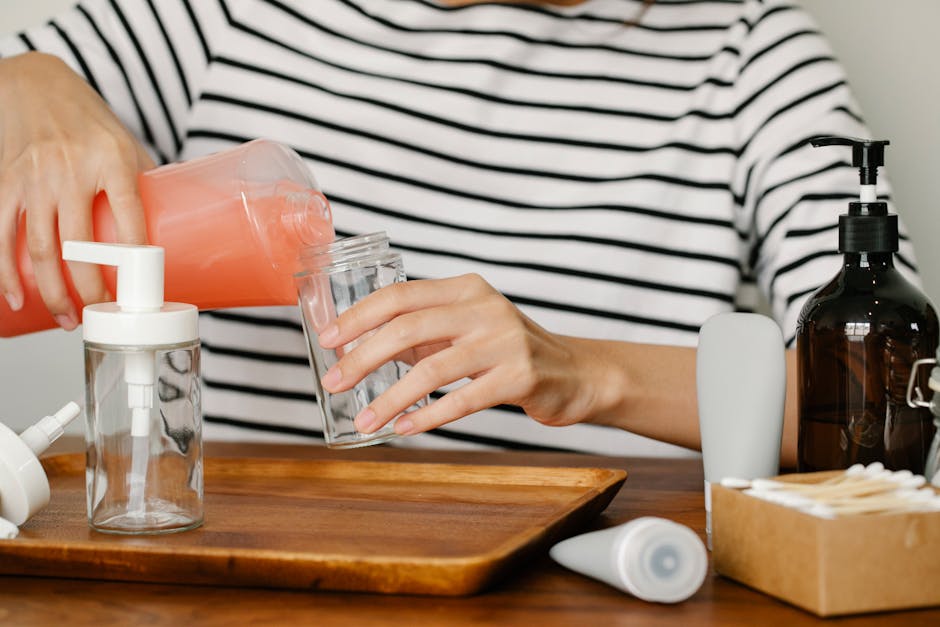
Pouring Soap Without Spills
Use a funnel or a narrow-spouted bottle to pour soap into the dispenser. This simple tool keeps soap from spilling onto your countertop, saving you cleanup time. Pour slowly and watch the liquid level to avoid overfilling.
Consider the type of soap you’re using—thicker soaps might require a little extra patience to flow smoothly. Have you ever had a soap refill turn into a slippery mess? Taking your time here can prevent that frustration.
Reattaching The Pump Head
After filling, carefully screw the pump head back onto the dispenser. Turn it clockwise until it feels snug but avoid overtightening, which can crack the plastic or strip the threads. Test the pump a few times to make sure soap dispenses smoothly.
If the pump doesn’t work immediately, try priming it by pressing several times. Sometimes air pockets need to clear before the soap flows freely again.
Troubleshooting Common Issues
Troubleshooting common issues helps keep your built-in kitchen soap dispenser working smoothly. Problems can arise from normal use or from improper filling. Fixing these issues quickly saves time and prevents frustration.
Soap Not Dispensing Properly
Soap may not come out due to air trapped in the pump. Pump the dispenser several times to clear air pockets. Another cause is using soap that is too thick. Dilute thick soap with a little water for smoother flow. Check the soap level; low soap can stop dispensing.
Clogged Dispenser Pump
Soap residue can build up and clog the pump. Remove the pump and soak it in warm water to dissolve soap buildup. Use a thin brush or toothpick to clear any small blockages. Rinse the pump thoroughly before reassembling. Avoid letting soap dry in the pump to prevent clogs.
Maintaining Your Soap Dispenser
Maintaining your built-in kitchen soap dispenser ensures it works smoothly and lasts longer. Neglecting this small appliance can lead to clogs and soap buildup, which makes refilling a frustrating task. Taking a few simple steps regularly can keep your dispenser clean and efficient.
Regular Cleaning Tips
Clean your soap dispenser at least once a month to avoid any blockages. Use warm water mixed with a little vinegar to rinse out the pump and reservoir. This helps dissolve any dried soap residue that might clog the mechanism.
Remove the dispenser pump and soak it for 10-15 minutes to loosen buildup. After soaking, pump warm water through it several times to flush out any remaining soap. Don’t forget to wipe the exterior with a damp cloth to keep it looking neat.
Preventing Soap Buildup
Using the right soap consistency prevents buildup inside your dispenser. Avoid thick or gel-based soaps that can clog the pump quickly. Instead, opt for liquid soaps that are designed for dispensers, which flow easily and keep the mechanism clear.
Try to refill the dispenser before it runs completely dry. Running it empty can cause air pockets, making pumping difficult and increasing the chance of clogs. Have you noticed your dispenser getting harder to use? This simple habit might be the cause.
Frequently Asked Questions
How Do You Refill A Built-in Soap Dispenser?
To refill a built-in kitchen soap dispenser, lift the pump head straight up. Then, pour liquid soap into the bottle using a funnel. Be careful not to overfill. Finally, reattach the pump head securely. This simple method ensures your dispenser works smoothly and efficiently.
What Type Of Soap Is Best For Dispensers?
For built-in kitchen soap dispensers, use liquid dish soap or hand soap. Ensure the soap is not too thick, as it can clog the dispenser. Avoid using foaming soaps, as they may not work properly. Always follow the manufacturer’s recommendations for best results.
How Often Should You Refill The Dispenser?
The frequency of refilling depends on usage. On average, refill the dispenser every 1-2 weeks. Monitor the soap level regularly to avoid running out. A transparent or semi-transparent bottle can help you easily see when it’s time to refill.
Can You Use Hand Sanitizer In Dispensers?
Yes, you can use hand sanitizer in a built-in soap dispenser. Ensure the sanitizer is liquid, not gel, to avoid clogging. Clean the dispenser periodically to prevent residue buildup. This can be a convenient option for maintaining hygiene in the kitchen.
Conclusion
Filling a built-in kitchen soap dispenser is simple and quick. Always remove the pump before adding soap. Use liquid soap that flows easily to avoid clogs. Clean the dispenser regularly to keep it working well. This small task saves space and keeps your kitchen tidy.
Try these steps next time you refill. Enjoy a neat and easy soap solution every day.

Sophie Hartwell is the founder of KitchenQuik.com, where she shares kitchen tips, smart cooking hacks, and the best product picks to make everyday cooking easier and more enjoyable.


