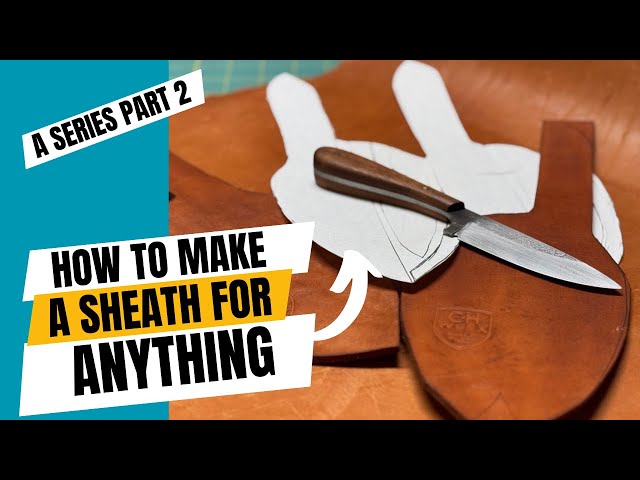

Are you tired of your kitchen knife slipping around or getting damaged when stored? Making your own kitchen knife sheath is easier than you think—and it’s a smart way to keep your knives sharp and safe.
In this guide, you’ll discover simple steps to create a custom sheath that fits your knife perfectly. By the end, you’ll protect your tools and add a personal touch to your kitchen gear. Ready to get started? Let’s dive in!
Materials Needed
Creating a kitchen knife sheath requires the right materials for safety and durability. Choosing quality supplies makes the project easier and the final product stronger. This section covers the essential materials needed to make a knife sheath that fits well and lasts long.
Choosing The Right Leather
Leather is the best material for a knife sheath. It is tough and protects the blade well. Pick leather that is thick and firm, about 3 to 4 mm thick. Vegetable-tanned leather works great because it molds easily and is strong.
Look for leather that is smooth and free from cracks. Avoid very soft or thin leather, as it won’t hold the knife safely. The leather should be large enough to cover the entire blade plus some extra for stitching.
Additional Tools And Supplies
- Sharp utility knife or rotary cutter to cut leather cleanly
- Metal ruler or straight edge for precise measurements
- Leather hole punch for stitching holes
- Waxed thread and leather needles for strong stitching
- Cutting mat to protect your work surface
- Contact cement or leather glue to hold pieces in place
- Mallet or hammer to help with hole punching
- Edge beveler to smooth sheath edges
Credit: www.amazon.com
Measuring Your Knife
Measuring your knife accurately is the foundation of creating a well-fitting sheath. A sheath that’s too tight or too loose can either damage your knife or make it unsafe to carry. Taking precise measurements ensures your knife stays secure and easy to access whenever you need it.
Determining Blade Length
Start by measuring the blade from the tip to where it meets the handle. Use a ruler or a tape measure with clear markings for accuracy. Hold your knife steady on a flat surface to avoid mistakes.
Consider adding a small margin—about 1/8 inch (3mm)—to the blade length. This extra space helps protect the blade’s edge and makes sliding the knife in and out smoother. Have you noticed how a sheath that’s too tight can dull your blade over time?
Accounting For Handle Size
The handle often dictates how deep your sheath should be. Measure the handle’s length from where it meets the blade to its end. Don’t forget to include any curves or guards that might affect the fit.
Adding a bit of extra room around the handle area can prevent wear and tear on the sheath material. Think about how you’ll grip your knife—will the sheath cover the entire handle or just part of it? This decision impacts both safety and comfort.
Cutting The Leather
Cutting the leather is a crucial step in making a kitchen knife sheath. It shapes the leather into the right form and size. Accuracy and care are essential to get clean, precise edges. This process sets the foundation for a sturdy and well-fitting sheath.
Marking The Pattern
Start by placing your pattern on the leather. Use a pencil or a blunt tool to trace around the edges. Mark all important points clearly. This helps guide your cutting and reduces mistakes. Double-check the markings before cutting. Keep the pattern flat and secure to avoid slipping.
Using Cutting Tools Safely
Select a sharp knife or rotary cutter for clean cuts. Always cut on a stable surface, like a cutting mat. Hold the leather firmly but avoid too much pressure. Cut slowly along the marked lines for accuracy. Keep fingers away from the blade to prevent injury. Store tools safely after use to avoid accidents.
Shaping The Sheath
Shaping the sheath is a crucial part of making a kitchen knife sheath. This process ensures the sheath fits the knife perfectly and protects it safely. Proper shaping also adds to the sheath’s durability and style. Using the right techniques helps the leather or material mold smoothly around the knife.
Wet Molding Technique
Wet molding softens the leather for easy shaping. Soak the leather in water until it feels damp but not dripping. This makes the material flexible and ready to mold.
Press the wet leather gently around the knife blade. Use your fingers or a smooth tool to shape the edges. Hold the leather firmly in place to keep the form while it dries. The leather will harden and keep the knife’s shape once dry.
Forming The Knife Pocket
Creating the knife pocket means making a snug space for the blade. Place the knife on the leather and fold the sides up around it. Make sure the knife fits tightly but can slide in and out easily.
- Mark the edges with a pencil for cutting and stitching.
- Cut the leather according to your marks for the pocket size.
- Use clamps or clips to hold the leather around the knife.
- Check the fit often during shaping to avoid a loose pocket.
This careful forming keeps the knife secure and protects the blade from damage. The pocket’s shape must match the knife’s unique curves for the best fit.
Assembling The Sheath
Assembling the Sheath Start by gathering leather, scissors, and a ruler. Cut the leather to fit the knife blade snugly. Stitch the edges securely to create a durable sheath.
Crafting a sheath for your kitchen knife not only protects the blade but also ensures safety in your kitchen. Assembling the sheath is a crucial step in this DIY project. Precision and patience are your best allies here. You’ll find that creating a sheath is not just about functionality; it’s also an opportunity to personalize your kitchen tools.Punching Stitch Holes
Begin by marking the spots where you’ll punch holes for stitching. Use a pencil or an awl to create evenly spaced dots along the edge of your sheath material. Remember, consistency is key. Uneven holes can lead to a weak stitch and an unprofessional look. Next, use a leather punch or a similar tool to create the holes. Ensure they are large enough for your needle and thread but not too large to compromise the sheath’s integrity.Stitching Methods For Durability
Selecting the right stitching method can make a significant difference in the sheath’s durability. The saddle stitch is a popular choice for its strength and aesthetic appeal. Thread two needles with waxed thread and use them simultaneously to create a tight, secure stitch. This technique ensures the sheath remains intact even with frequent use. Alternatively, the whip stitch offers a simpler yet effective approach. It involves looping the thread over the edge, providing a clean finish. Think about how often you’ll use the sheath. A more durable stitch might be worth the extra effort if you anticipate heavy usage. Engage with your project. What type of stitching feels right for your needs? Consider your skill level and the time you have available. By focusing on these steps, you’ll create a kitchen knife sheath that not only serves its purpose but also adds a touch of personal craftsmanship to your kitchen.
Credit: www.amazon.com
Finishing Touches
Finishing touches bring your kitchen knife sheath from simple to stunning. They protect the edges, add functionality, and enhance the overall look. Pay attention to these details to make your sheath both durable and easy to use every day.
Edge Burnishing Tips
Burnishing the edges of your sheath smooths rough cuts and gives it a polished feel. Use a burnishing tool or even a piece of hardwood to rub along the edges in firm, circular motions.
Try applying a bit of beeswax or edge dressing to help the leather fibers seal tightly. This not only looks professional but also prevents fraying and water damage.
Have you noticed how a smooth edge feels better in your hand? That small effort makes a big difference in comfort and longevity.
Adding Belt Loops Or Clips
Adding a belt loop or clip turns your sheath into a practical carry option. Choose a sturdy leather strip or metal clip that matches your style and intended use.
Sew or rivet the loop securely to the sheath’s back, ensuring it can hold the weight of your knife without pulling loose. If you prefer clips, look for ones with strong springs and easy attachment.
Think about where you’ll carry your knife most often—on your waist, apron, or bag—and choose the attachment accordingly. How you carry your knife influences your daily workflow more than you might expect.
Care And Maintenance
Taking care of your kitchen knife sheath is just as important as making it. Proper maintenance keeps the leather strong and looking great, protecting your knife safely for years. Neglecting care can lead to cracks, stiffness, or even mold, which defeats the purpose of crafting a sheath in the first place.
Cleaning Leather Sheaths
Leather sheaths need gentle cleaning to avoid damage. Use a soft, damp cloth to wipe away dirt and dust—never soak the leather in water. If stains appear, try a mild soap solution, but test it on a small area first to avoid discoloration.
After cleaning, let the sheath air dry naturally, away from direct heat or sunlight. This prevents the leather from drying out and cracking. Regular cleaning keeps the leather supple and extends the sheath’s lifespan.
Preventing Wear And Tear
Leather wears down with constant use, but you can slow this process. Apply a quality leather conditioner every few months to keep the material flexible and water-resistant. Avoid using harsh chemicals or oils that might weaken the leather.
Store your sheath in a cool, dry place when not in use. Think about how often you draw and insert your knife—repetitive friction can cause scratches or stretch marks. If you notice any loose stitches or thinning areas, repair them promptly to avoid bigger issues.

Credit: www.tupperware.com
Frequently Asked Questions
What Materials Are Best For Making A Kitchen Knife Sheath?
Leather and durable synthetic fabrics are ideal for kitchen knife sheaths. They protect the blade and provide a secure fit. Choose materials that resist moisture and wear for long-lasting use and safety in the kitchen.
How Do You Measure A Knife For A Custom Sheath?
Measure the blade length and width precisely. Include the knife’s thickness to ensure a snug, secure sheath fit. Accurate measurements prevent damage and enhance safety during storage and transport.
Can I Make A Knife Sheath Without Sewing Skills?
Yes, use adhesive, rivets, or heat bonding techniques. These methods secure materials without sewing. Choose strong, flexible materials and follow safety guidelines for a durable kitchen knife sheath.
How Do I Maintain A Homemade Kitchen Knife Sheath?
Keep the sheath clean and dry to prevent mold. Regularly condition leather sheaths with oil. Inspect for wear and repair any damage promptly to ensure safety and durability.
Conclusion
Making a kitchen knife sheath protects your blade and keeps you safe. It also helps to store your knife properly. You only need a few tools and simple steps to create one. This project saves money and adds a personal touch to your kitchen gear.
Try it yourself and enjoy a safer cooking experience. Small efforts make a big difference in kitchen safety and knife care. Keep your knives sharp and secure with a homemade sheath.

Sophie Hartwell is the founder of KitchenQuik.com, where she shares kitchen tips, smart cooking hacks, and the best product picks to make everyday cooking easier and more enjoyable.