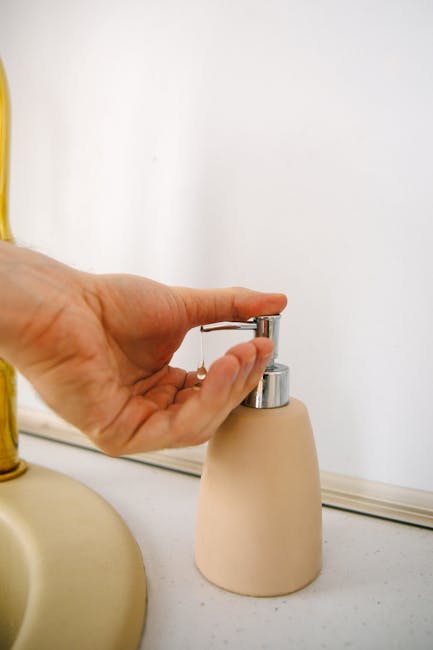
Are you tired of clutter around your kitchen sink and want a cleaner, more organized space? Installing a hand soap dispenser right at your sink can make a big difference.
It’s simple, convenient, and adds a touch of style to your kitchen. In this guide, you’ll learn exactly how to install a hand soap dispenser step by step, even if you’ve never done it before. Keep reading, and you’ll have a neat, easy-to-use soap dispenser ready in no time!
Tools And Materials Needed
Installing a hand soap dispenser near your kitchen sink makes hand washing easier and keeps the counter neat. Having the right tools and materials ready makes the job smooth and fast. This section lists all essentials needed for a successful installation.
Hand Soap Dispenser Kit
Choose a dispenser that fits your sink style. Kits usually include the pump, soap bottle, and mounting hardware.
Drill And Drill Bits
A drill helps create a hole in the sink or countertop. Use drill bits suitable for your surface material like metal or granite.
Measuring Tape And Marker
Measure the spot carefully. Mark the exact location for the hole to avoid mistakes.
Adjustable Wrench And Screwdriver
Use the wrench to tighten nuts under the sink. The screwdriver is needed for securing mounting parts.
Plumber’s Putty Or Silicone Sealant
Apply putty or sealant around the dispenser base. This prevents water leaks and keeps the area dry.
Bucket And Towels
Keep a bucket to catch water from pipes. Towels help clean spills and dry the area quickly.
Choosing The Right Soap Dispenser
Choosing the right soap dispenser for your kitchen sink is more important than you might think. The right dispenser not only adds convenience but also complements your kitchen’s style and fits your daily needs. Let’s look at what you should consider to make a smart choice.
Material And Durability
Think about the material of the soap dispenser. Stainless steel models are sturdy and resist rust, making them perfect for busy kitchens. Plastic dispensers may be cheaper but can wear out quickly, especially if you use them often.
Ask yourself how often you’ll use it and how much wear it will face. This helps you pick a dispenser that lasts and saves you money in the long run.
Soap Type Compatibility
Not all dispensers work with every type of soap. Some are designed for liquid soap, others for foam soap. Using the wrong soap can clog or damage the dispenser.
Check what type of soap you prefer. This ensures your dispenser works smoothly every time you wash your hands.
Installation And Size
Measure the space around your sink before buying a dispenser. Some models need extra countertop space or a hole in the sink or countertop for installation.
If you have a small kitchen, a compact design will save space and keep your area tidy. Also, consider how easy it will be to install it yourself.
Style And Finish
Your soap dispenser should blend with your kitchen’s look. Whether you have a modern kitchen or a rustic one, there is a style that fits perfectly.
Think about finishes like brushed nickel, chrome, or matte black. Matching the dispenser with your faucet or cabinet handles can give your kitchen a polished feel.
Refill Method
Some soap dispensers refill from the top, while others require you to remove the bottle from under the sink. Top-refill models are easier and quicker to use.
Consider how often you want to refill and how much effort you want to put into it. This small detail can make a big difference in your daily routine.
Preparing The Kitchen Sink
Preparing your kitchen sink before installing a hand soap dispenser sets the foundation for a smooth and hassle-free setup. Taking time to organize and inspect the area can save you from unexpected issues during installation. It’s about creating the right conditions so the dispenser fits perfectly and works well.
Clearing The Area
Start by removing everything around your sink. Clear away soap bottles, sponges, and dish racks to give yourself enough workspace. A tidy area helps you avoid knocking things over and lets you focus on the installation without distractions.
Don’t forget to wipe down the sink surface. A clean sink makes it easier to spot any damage or dirt that might interfere with the dispenser’s base. Plus, you’ll have a better grip on tools and parts, reducing the risk of slips.
Checking For Pre-existing Holes
Look carefully at your sink and countertop for any existing holes. Many sinks have an extra hole meant for accessories like soap dispensers or sprayers. Using an existing hole can save you from drilling, making installation simpler and less risky.
If you don’t find a hole, consider the size and location for drilling one. Think about where you reach most comfortably and where the dispenser won’t get in the way of daily tasks. Have you checked if your sink material can handle drilling without cracking?
Drilling A Hole In The Sink
Drilling a hole in your kitchen sink allows you to install a hand soap dispenser neatly. This step requires care and precision to avoid damage. Choosing the right spot and using the correct tools ensures a clean hole. Preparing the sink surface properly helps in making the process smooth.
Safety Precautions
- Wear safety goggles to protect your eyes from metal shards.
- Use gloves to protect your hands from sharp edges.
- Ensure the area under the sink is clear and dry.
- Turn off the water supply to avoid leaks during drilling.
- Mark the drilling spot clearly before starting.
- Keep a steady grip on the drill to prevent slips.
Proper Drilling Techniques
- Use a drill with a variable speed setting for better control.
- Start drilling with a small pilot hole to guide the bigger bit.
- Use a hole saw bit designed for metal or the sink material.
- Keep the drill perpendicular to the sink surface for a clean hole.
- Apply gentle, steady pressure to avoid cracking or warping.
- Use masking tape over the drilling spot to reduce slipping.
- Pause frequently to cool the drill bit and prevent damage.
- Clean the hole edges with sandpaper or a file for smoothness.
Installing The Soap Dispenser
Installing the soap dispenser might seem straightforward, but a careful approach ensures it works smoothly and lasts long. You want to avoid leaks and wobbly setups that make daily use frustrating. Let’s look at how to position and secure your dispenser correctly so it fits perfectly with your kitchen sink.
Positioning The Dispenser
Choose a spot on your sink or countertop that’s easy to reach while washing your hands or dishes. Usually, near the faucet but not too close to avoid splashes works best.
Make sure there’s enough space underneath for the soap bottle. Check for any pipes or obstructions under the sink that might block installation. You can test the height by holding the bottle in place before drilling any holes.
Have you considered how the dispenser’s spout angle affects where the soap lands? Position it so soap goes directly into your hand or the sink, not on the countertop. This small detail keeps your area cleaner and reduces waste.
Securing The Base
After deciding the position, place the dispenser base on the chosen spot. Most dispensers come with a threaded shank and mounting nut that you’ll secure from underneath the sink.
Insert the shank through the hole and tighten the nut by hand first. Then, use a wrench or pliers to firmly secure it but avoid overtightening, which can crack the countertop or damage the dispenser.
If your sink or countertop is thick, you might need an extension kit. Do you have one, or will you need to buy it? Ensuring a tight fit prevents wobbling and leaks that can ruin your kitchen cabinet.
Finally, connect the soap bottle to the dispenser pump and fill it. Test the pump a few times to make sure the soap flows smoothly and the dispenser stays firmly in place. This hands-on check saves you from surprises later.
Connecting The Soap Bottle
Connecting the soap bottle to your kitchen sink dispenser is a crucial step that ensures smooth soap flow and prevents leaks. This part often gets overlooked, but a proper connection saves you from unnecessary mess and frequent refills. Let’s break down the process to help you secure the bottle correctly and maintain a clean, functional setup.
Attaching The Bottle
Start by aligning the soap bottle with the dispenser pump. Most bottles have a threaded neck designed to twist securely onto the pump mechanism. Hold the bottle firmly and turn it clockwise until it feels snug but avoid overtightening.
Check if the bottle sits straight under the sink; a tilted bottle can cause soap to drip or pump unevenly. If your dispenser came with a mounting bracket, use it to stabilize the bottle. This prevents accidental disconnections when you press the pump.
Ensuring A Tight Seal
A tight seal is essential to prevent leaks and keep soap flowing only when you want it to. After attaching the bottle, inspect the connection point for any gaps or loose threads. If you notice any, try tightening the bottle a bit more or apply a thin layer of plumber’s tape on the threads before reconnecting.
Shake the bottle gently to test for leaks. If soap seeps out, the seal isn’t tight enough. Adjust the fit until you stop seeing drips. Have you ever dealt with soap stains under your sink? A reliable seal can save you from that frustrating cleanup.
Testing The Dispenser
Testing the hand soap dispenser is an important step after installation. It ensures the dispenser works properly and avoids messes. Take your time to check every part carefully.
Filling With Soap
Start by removing the dispenser pump. Pour liquid soap into the container slowly. Fill it up but leave some space at the top. This prevents overflow when you press the pump.
Secure the pump back tightly. Make sure it fits well. Loose parts can cause leaks and reduce soap flow.
Checking For Leaks
Press the pump a few times to release soap. Watch the area under the sink and around the dispenser. Look for any drips or wet spots.
Leaks can come from loose connections or cracks. Tighten fittings carefully if you see leaks. If leaks persist, check the soap container for damage.
Maintenance Tips
Keeping your hand soap dispenser in top condition ensures it works smoothly every time you need it. Regular maintenance helps prevent clogs and keeps your kitchen sink area neat and hygienic. Let’s look at two key maintenance tasks that make a big difference.
Cleaning The Dispenser
Soap residue can build up inside the dispenser, causing blockages. Clean it at least once a month to avoid this problem. Simply remove the dispenser pump and soak it in warm water mixed with a little vinegar to dissolve any soap buildup.
Use a small brush or toothpick to clear the nozzle if needed. Rinse everything thoroughly before putting it back. Have you noticed your dispenser working slower over time? A quick clean might be all it needs.
Refilling The Soap
Don’t wait until the dispenser is completely empty before refilling. Low soap levels can draw air into the pump, making it hard to get a good squirt. Top it up when the level drops below one-third for smooth operation.
Choose a soap that matches your dispenser type—thick or foaming formulas require different pumps. Avoid overfilling, as spilled soap creates sticky messes. How often you refill depends on your household use, but keeping an eye on the level saves you from sudden surprises.
Frequently Asked Questions
How Do I Install A Hand Soap Dispenser In Kitchen Sink?
To install, first drill a hole in the sink or countertop. Insert the dispenser pump and secure the bottle underneath. Connect the pump tube to the soap bottle. Fill the bottle with soap, then test the pump for smooth dispensing.
What Tools Are Needed For Soap Dispenser Installation?
You need a drill with a hole saw bit, adjustable wrench, screwdriver, and plumber’s putty. These tools help create the hole, tighten fittings, and seal the dispenser to prevent leaks.
Can I Install The Dispenser Without Professional Help?
Yes, installation is simple and DIY-friendly. Follow instructions carefully and use appropriate tools. Most dispensers fit standard sink holes, making it easy for beginners to install.
How To Choose The Right Soap Dispenser Size?
Measure the sink hole and countertop thickness before buying. Choose a dispenser with a bottle large enough for your soap needs. Ensure the pump fits your soap type, such as liquid or foam.
Conclusion
Installing a hand soap dispenser at your kitchen sink is simple and quick. Follow the steps carefully to avoid mistakes. Choose the right spot and tools before you start. Tighten connections to stop leaks and test the dispenser. Clean your workspace after finishing the job.
A soap dispenser keeps your kitchen tidy and soap handy. Small changes can make daily tasks easier and neater. Enjoy the convenience and cleanliness it brings to your sink area.

Sophie Hartwell is the founder of KitchenQuik.com, where she shares kitchen tips, smart cooking hacks, and the best product picks to make everyday cooking easier and more enjoyable.
